
Have you sewn up your own version of the FREE Basic T-shirt pattern for kids yet? A free pattern is awesome enough in itself (especially one with a beautiful neck seam cover detail!), but how could we up this awesomeness even more?
How about some very easy hacks to make it not so basic? Don't get me wrong, there's absolutely nothing wrong with a basic T-shirt; in fact, it is the perfect canvas to show off your prints. But if you are in the mood to jazz it up a little, this post is for you 😉

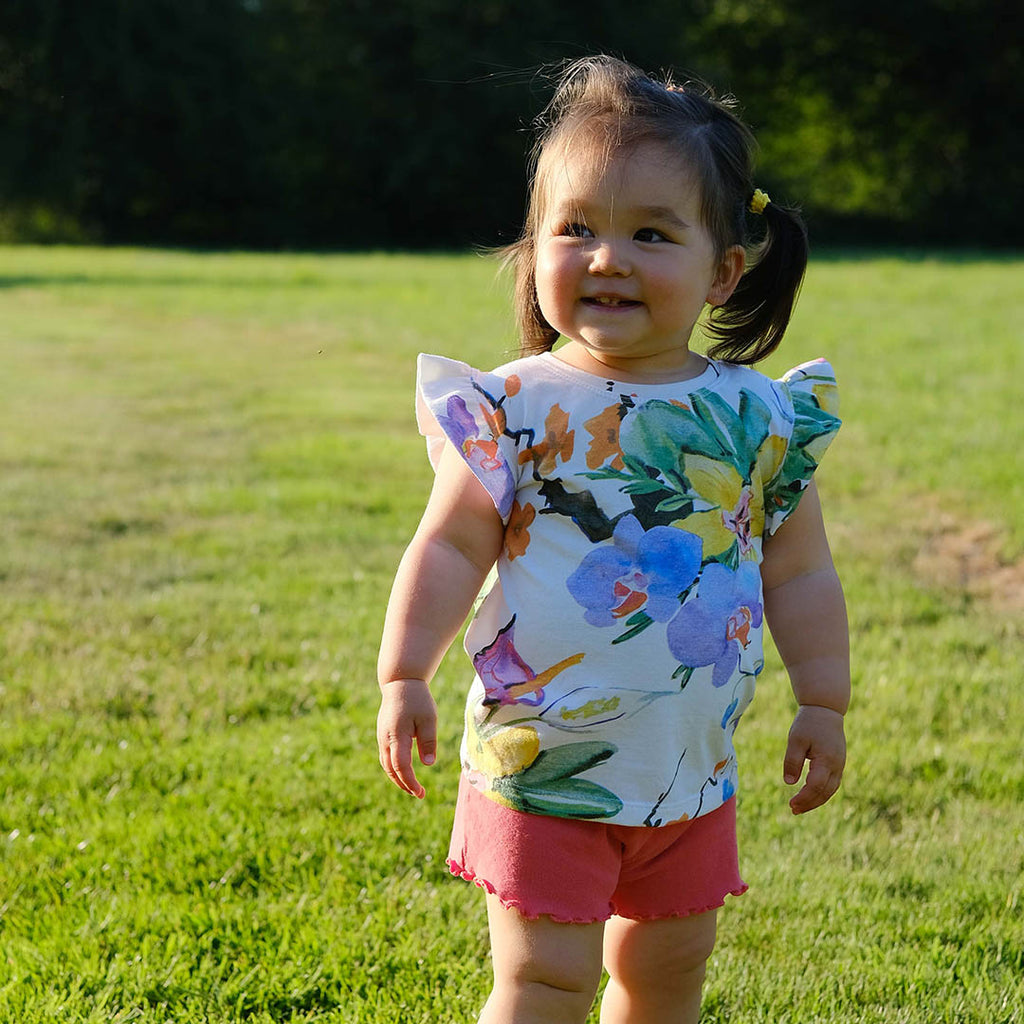
Easy Hack #1 - Flutter Sleeves
Before I had Freya, I was not really into ruffles. But what do you know? Freya came along with her chubby little arm rolls, and suddenly ruffles and flutter sleeves became irresistible to me.
Last summer, I made her a self-drafted flutter sleeve romper (mimicking a ready-to-wear summer romper that she looked adorable in), using this lovely single jersey (anyone remember this, by the way?). Summer rolled along again, and of course Freya outgrew that romper. Thankfully I had enough remnant to make a little flutter sleeve T-shirt.

It’s so easy to create your own! Before I get into the hack, I want to caveat by saying that there are a few different ways of adding flutter sleeves, and what I'm showing you here is my preferred method. In terms of design, these sleeve pieces go all the way round the armscycle, so that you don’t have to worry about finishing the remaining edge, nor hemming the sleeve! The fabric will also be double-sided, so that you won't have to worry about the plain reverse side flipping up on a windy day. Sound ok? Let's begin.
Instead of the sleeve pattern piece, you would need to draft your own flutter sleeves pattern like the one below. Don't worry, I'll take you through it.
You'll need the following measurements:
- Armcycle (A) - measure around the pattern pieces and deduct the seam allowances - I made a size 2T with 3T width, and A for me is approx 30cm
- The desired depth of the flutter sleeve at the top shoulder seam (T) - I wanted mine to be 3.5cm deep
- The desired depth of the flutter sleeve at the bottom (armpit) - (B) - I wanted this to be 1cm.
Use these measurements to draw the following pattern (the picture is not to sale, and just for demonstration purposes only):

For the length of the straight edge, you'll see that I used a factor of 1.6. You could use any factor between 1.5 and 2, depending on how tight you want the gathers (eg. if you want the ruffles to be more profound, go for a factor of 2).
Cut two of these on the fold.

Sew up the shoulder seams on the top as per the instructions. You’ll see here that I’ve also sewn the neckband already – I was on auto pilot and did my normal shoulder – neck band – sleeve – side seam thing. Don't mind me - it makes no difference to the construction of our flutter sleeves.

Fold the pieces width wise, with wrong side together.

Sew 2 parallel long basting stitches along the curvy edge within the 1cm seam allowance, without backstitching. Here’s a cheeky tip for you – you know when you often end up with just a tiny bit of thread left on your bobbin after a sewing project? This is the time to use them up! You’ll have to eyeball and make a judgement on whether there is enough left on the bobbin, because you don’t want to be running out half way through. Thankfully, I’ve got pretty good at this over the years, and I’m pleased to report that I was rewarded with 4 new “newly available” bobbins and some colourful basting stitches.

I digress. Gather up the curved side by pulling the (colourful) bobbin threads until the gathers look even and that the length matches the armcycle. Pin or clip the gathered side to the right side of the top, ensuring that the ends match up nicely.

Sew with the 1cm seam allowance. Carefully remove basting stitches so the seams stretch properly again.

Did I mention that the sleeves won't need hemming?
The flipside of the no hemming is that you'll have to be extra careful in the next step, aligning the bottom of the sleeves properly (as any unevenness can't be hidden in the hem). Pin or clip the bodice sides together (with right sides together), from the sleeves through to the hem.

I like to baste the top few centimetres, where the bottom of the sleeves join up, with my sewing machine here. This gives me better control, before running my overlocker down the entire seam.

Here's proof that it is worth the additional step!

Now, follow the rest of the steps in the instructions and finish your neckline and hem.
Wasn’t that easy?
Ready for another hack?

Easy Hack #2 - gathered peplum
It’s so easy to hack a T-shirt pattern into a peplum top! Let's jump straight in.
First, alter the front and back bodice pattern pieces of the T-shirt, by chopping off some length at the bottom. I used a couple of Freya’s ready-to-wear peplum tops to gauge how much to chop off. Essentially you'll want to chop somewhere below the waistline, and allow 1cm for the seam allowance, too. It doesn't have to be overly scientific. For reference, I removed 11.5cm from the 2T length for this top, and she is 22 months’ old.
Next, draw a rectangle piece for the peplum. This will be used to cut the identical front and back peplum pieces.
- For the height/width, I wanted my finished peplum to be 10cm tall, so I added 1cm seam allowance at the top, and 2cm hem to get the width of my pattern piece (13cm).
- For the length, I measured the width of the bottom of the new bodice front and back pieces. They were both 16cm wide including a 1cm seam allowance, and to be cut on the fold, which means that I'm working with a width of roughly 60cm. Now multiple this measurement by 1.25, and you have the length of your long rectangle.
If you are following my reference, my rectangle was a long strip measuring 75cm long (horizontal) and 13cm tall (vertical).
If maths aren't your thing, I have a cheeky short-cut for you. You know the strip that you chopped off the bottom of the bodice front and back pieces? Take one of those, add 1cm at the top, and "stretch" this to be 2.5 times long horizontally. Now you have your pattern piece!
Cut 2 of these, one front and one back piece. For me, I wanted to cut the fabric in the most efficient way, (as I am planning on making some leggings for me from what's left) so I ended up cutting 2 back pieces with a centre back seam.
Another little tip for you - if you are using a stripy fabric, have you thought about rotating the fabric 90 degrees to have mismatched strips?
Right, let's sew! First, follow the instructions (as if you have cut the full T-shirt pieces) all the way until just before the hemming step.
Join the peplum front and back strips with right sides together, making a long loop.

Mine looks a bit different as I cut 2 back pieces.
Gather up the top edge with 2 long, parallel basting stitches within the seam allowance (see more blurb on gathering in Hack #1 above). Do not backstitch or overlap your start and end stitches, but you also want to minimise the gap between when you end and where you started.
Pull the bobbin threads evenly to gather. Pin or clip this to the bottom of the T-shirt, with right sides together, matching up the side seams.

Sew this up with the 1cm seam allowance. Remove basting stitches.

Then hem as per the instructions, and you are all done!

But I won't stop here. How about a few extra bonus ideas?
Bonus idea #1
Why stop at the peplum? Add more height to your rectangle from Hack #2, and you'll have a little dress on your hands!
Bonus idea #2
How about a little patch pocket? A contrast pocket (plain for print, or vice versa) could add a lovely design element, and you won't even need to worry about pattern matching. The simplest one to draft is just a little rectangle, but you could fold the bottom corners for an extra fancy touch. There are lots of tutorials out there for pockets, and I can't top those.
Bonus idea #3
How about not even adding the ruffles, and making a crop top for the hotter months?
Bonus idea #4
Last but definitely not least, how about an origami boat? I don't know about you, but I can't wait to try this!
That's it from me today. I hope this post has helped getting your creative juices flowing, and shown you what a gift this FREE pattern is!
Until next time,
Alice (and Freya) from Queen of Darts


Absolutely fantastic
Bertha Ticklemore on
How do you get the free pattern please
Linda on
How do we download the free tee shirt pattern?
Thank you.
Mary Joiner on
These t-shirts look great I am going to have a go at making them. Thans. Glad I found you website
Sandra
SANDRA GRAY on
What fabulous ideas, I am somewhat confused with the measurements- not very bright with maths, but I am sure I would somehow work it out.
Pat Colliss on